Showing posts with label projects. Show all posts

Monday, September 23, 2013

Homemade Chalkboard Tutorial

A few weeks ago, I stumbled upon this tutorial on the HGTV website from Miss Mustard Seed herself.  I knew instantly that I NEEDED a large chalkboard for myself!!  I just needed the right supplies.  While I was in my favorite thrift store in Milton, FL, Helping Hand Missions, I saw a gorgeous, excessively large curvy mirror.  The frame was plastic and ugly but it had a wood grain...I had found my supplies.  The mirror was SO heavy.  I had to get two men who worked in the store to carry it to the register for me and then put it in my car.  I didn't let the weight of it scare me though.  Adam got it out of the car when I got home and we proceeded to take the mirror out of the frame.  Talk about relief!! The frame weighed next to nothing, but I think that was the single-most heavy piece of glass/mirror I've ever seen in my life.  I followed Miss Mustard Seed's directions and purchased some hardboard and Rustoleum Chalk-Board paint and got to work.  I painted the frame in Annie Sloan Chalk Paint Aubusson Blue and waxed it with Miss Mustard Seed's Antiquing Wax and Furniture Wax.
*note the particular ugliness of the frame

Then my wood working-proficient hubby cut down the hardboard for me and I started painting it.  First, I primed the hardboard with some spray Kilz primer.  Then I started the chalkboard paint coats.
The first coat looked pretty rough.
The second coat looked better.
And the third coat is what sealed the deal.  I put the chalkboard into the frame and proceeded to wait for THREE WHOLE DAYS!!  I know, right, but the chalkboard paint has to cure before you can start writing on it :(  Major bummer. 
Once my three days were up, it was time to season the chalkboard!!
To season a chalkboard you rub a piece of chalk sideways all over the chalkboard, covering it with chalk dust and then erase it.
(*This is a step you need to remember because if you ever wash the chalkboard this has to be done again.)

I mulled over what design I should put on the chalkboard and came up with this:


And here's the final product, hanging in our den over our couch.

Now go find a frame and make one for yourself!!

Friday, September 20, 2013

Mercury Glass DIY

I've seen tutorials for DIY Mercury Glass floating around on Pinterest for quite some time now.  I've thought about it, focused on it, and finally decided that I do have enough skill to try to make some on my own.  I checked out several tutorials for DIY Mercury Glass and ended up with this one.  Cheryl from TidyMom.net seemed to explain all the steps easy enough to follow so I gathered up my supplies and got started.
For this project, you need a clear glass container (like the vase above), a spray bottle with equal parts warm water and vinegar (I used plain white vinegar), and Krylon Looking Glass spray paint.  After you go in search of the spray paint, take a deep breath and get over the panic attack you have for seeing such a small can of paint for almost 10 bucks.


On my way out the door, I also grabbed two cheapo glass candlesticks and decided to give them the treatment too:)  First, spray the inside of your vase with the water/vinegar mixture (for the candlesticks I had to spray the outside of course).  You will see water droplets form.  LEAVE THEM THERE!!  That's what you want.  Then gently start spraying the inside of your vase with the looking glass paint.  This paint is insanely thin.  I was suspicious my can wasn't working at first.  But after each spray, give your vase a turn to evenly disburse the paint.  Let it dry for about a minute and then give it another spray.  I did this about 5 times, let it sit for about 10 minutes and repeat until you get the desired look.  It only took about 4 coats on the candlesticks.  I guess that was because I was spraying it directly.
Anywho...I know you're ready for the finished product.  So without further adieu, and no more guilding the lily...I present to you Sir Ulrich von Lichtenschtein....oh wait...wrong movie....DIY Mercury Glass!!


Thursday, September 19, 2013

Meet Belle...

Incidentally, my spot in the house for refinishing furniture is just outside of my daughter Becca's bedroom.  As I was trying to figure out what to do with my dainty new accent table, it saw Becca dressing up in one of her princess gowns.  It told me it wanted to feel pretty too and liked the simple understated elegance of Becca's Belle gown.  I told the sweet little table that I had just the thing for it:
 a soft coat of Miss Mustard Seed's Milk Paint in Mustard Seed Yellow
some light distressing to allow her brown base to show through (like Belle's soft brown hair),
 and a buttery coat of Miss Mustard Seed's Furniture Wax.
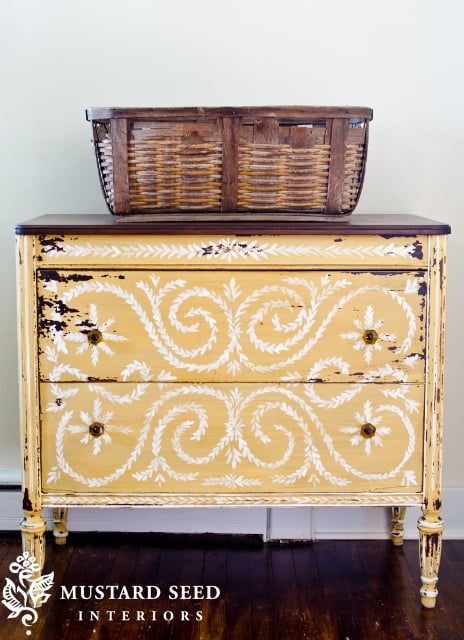
She said that she was down with everything, except she didn't want all of the busy white decoration in the picture of the dresser, so I told her that was cool; and we got started.


I couldn't get a good pic of her to start with, but here's the best idea
 of her before.


She had really dark roots so it took 3 coats of milk paint to get her consistently yellow.


After she dried, I began the distressing.  Milk paint is so glorious to distress.  All you have to do is gently run over the surface with the end of a small paint scraper, and the paint does the rest.  If it's going to distress, it distresses.  If it's not, it doesn't.  Its inescapably random and glorious at the same time and ends up giving you a unique finish every time.


And here she is in all her glory
Meet Belle....


Blue Drop Leaf Table

Today I want to share with yall a little beauty that I never got to name.  She was a gorgeous dark wood, but she had always wanted to be blue, so I obliged her.  I painted her with ASCP Aubusson Blue and did a combination of dark and clear wax on her.  I know, I know this piece has already sold and I didn't take any before shots.  I'm kicking myself.  But I still wanted to share this little gem with yall.


 This little beauty was whisked out of my life almost as quickly as she was whisked into it.  I'm proud to have gotten to paint her though :)


Wednesday, September 18, 2013

Kreo Cityville Invasion Marina Madness Set

KRE-O Cityville Invasion
I received this set from BzzAgent for my children to play with and review.  
Out of the box, the Kreo Cityville Invasion Marina Madness set looked like your standard building set. The minifigures are simple to assemble. Instructions are straightforward. Blocks....that's another story. My son (7yrs) has no trouble putting together Lego sets that have 10+ age guidelines (he's been doing those since he was 5), but this set was just plain hard to assemble. The blocks were hard to snap together. I even had trouble helping him assemble a few of the items. And while they were hard to snap together, once snapped, the whole construction fell apart at a simple bump on several occasions. After spending almost two hours putting together a seemingly small and simple set, my kids were done with it for several days and weren't even interested in checking out the app associated with it. This is a set they probably will have little interest in ever playing with again because of how often they have to rebuild it. Save your money and buy some Legos.

Tuesday, September 17, 2013

Sneak Peak of Today's Projects...


I recently came across this cute little step ladder and end table and they told me they both needed to feel a little prettier. I told them I was happy to oblige. Check back later to see how they turn out:)

Saturday, September 14, 2013

And so the projects begin...

To say that I've always wanted a blog might be taking things a little too far; but recently so many people have shown interest in keeping up with my life (even though I already live in a glass house so to speak). The natural conclusion...start a blog. Maybe people won't get their hopes too high, or maybe I just won't let them down. Either way, tonight I begin this journey of chronicling my life and activities. 
My latest passions, other than my Lord, my family, and all things Disney have been refinishing furniture. Not just the sanding, restaining, and varnishing that instantly comes to mind...but the as my husband calls it "ruining a pretty piece of furniture" sort of refinishing. Before the influx of chalk and milk paint on the design scene, I often found myself being made fun of for liking furniture that was painted and then "scratches up."  I am by no means a "wood purist," though I am a sucker for velvety smooth walnut finishes and intricate inlays. But give me some gloriously chippy milk-painted buffet or a buttery soft chalk painted dresser with light distressing and I go to a happy place. My hopes from this blog are to be able to share that happy place with you. And so, dear readers we begin this journey together.